User Guide

Welcome to our new website!

When creating this website our goal was to create an easy to use, modern website where our products can be easily found and purchased.

Our site works very similar to other online retail sites, but there are some features that are not common and knowing them will enable you to get more out of our site.

Let’s go over the various parts and functions of our website:

Table of Contents

The Header

The top part of the site is always visible and contains the most important functional and navigational elements. It contains:

The Logo

This is mainly for decorative purposes, so that you can instantly recognize that you are on the Dave’s Coins site. It also serves as a quick way to get back to the home page, if you click on it.

The Top Menu

The menu is pretty self explanatory with the menu items listed. Now, if you are on a small screen (such as a smart phone or tablet) which does not have enough space to show all menu items, the menu is indicated with the usual “hamburger” icon (three horizontal lines)
You would need to click on that see the menu items.

The Search Bar

Right below the menu, we placed the search bar. By being in the header it’s always visible and accessible no matter where you are on the site.

Because search is a major part of our website we have a dedicated page to give you details on how to search and navigate our extensive inventory of coins and other items in our store. Click here to read more about the search options

Login/Account

If you are not logged in then you will see “Login or Register” on the top right of the header.

If you click there you can log in, register a new account if you don’t have one yet, or recover your account if you can’t log in.

If you are already logged in you will see a little welcome message with your name.

In that case, if you move your mouse over this area (or tap on it, if you are using a smartphone or tablet) then you will get a small popup menu with the different account related pages. Feel free to explore these so you know where to find your account information.

Shopping Cart Icon

On the right side, you see the icon for the shopping cart. It shows a small number indicating how many items you have in your cart already.

If you click on it then on the right side you will see the items in your cart with options to remove them, edit the cart, or go to the checkout page.

Footer

The footer on the bottom of every page contains a simple sign-up for our newsletter, links to pages that are less frequently visited than the ones in the header, and finally links to our social media accounts.

We send out a newsletter about once a week with coin related news and announcements of our items on sales. If you are looking for good deals or want to stay in the loop about the world of numismatics then it’s an excellent resource for that.

CATEGORY PAGES

If you click on any of the categories on the home page, or navigate to one via the navigator in the advanced search, you will see something like this

THE BREADCRUMBS

At the top of category pages you will see a small bar like on the example.

This is to show you which page you are looking at right now, and all the previous (higher) categories are clickable, so you can easily go back to a parent category.

If you want to go to a completely different category (eg from Dimes to Quarters) then the fastest way is to use the navigator in the Advanced Search popup (see: article on search)

Sub-Categories

These are simply links to the categories within the category you are currently in. With these you can drill down to more specific coins that you are interested in.

If the category that you are viewing has no sub-categories then this section will not show.

Category Filters and Search

Below the sub-categories section you will find a slightly different search bar. This one is geared toward searching within the currently displayed category. It also allows you to hide or show items that are not in-stock at the moment. Normally, these items are shown unless you hide them.

The Product Tiles

The products within a category are shown in small tiles which contain the main image, the title of the item, the price and an action button (Add To Cart or Notify Me).

If you click on the tiles anywhere other than the action button then you will see the product detail page (see the description below)

If the product is in-stock then you will have the Add to cart button which will place one item in your cart (you can change the amount by editing your cart: clicking the shopping cart icon, and then View Cart button). If you click the button multiple times then you will place more of the item in your cart.

Notify-Me

If the product is currently out-of-stock then you will see a Notify Me button. If you click on this you will see a very simple form asking for your name and email address — if you are logged in then these will be filled out for you (but you can change it, if you wish).

The Notify-Me function is a really neat feature on our website that allows you to be among the first ones to be notified when we receive new stock of an item. So if you are after a certain coin, then you can place a Notify Me request on it.

Please note that the different grades of a coin are separate listings on our website. So if you are after a coin and have a range of grades that you would be satisfied with then add requests to all the ones you would be happy with.

When you submit a Notify-Me request then you will receive an email about it that acknowledges your request and provide you with a link to cancel the request if it becomes necessary.

The footer also contains a link called “Manage Notify-Me Requests” that will allow you to see all the requests that you have made and you can cancel them, or “revive” (re-activate) them if you need that.

Wishlist

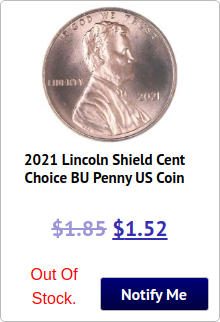
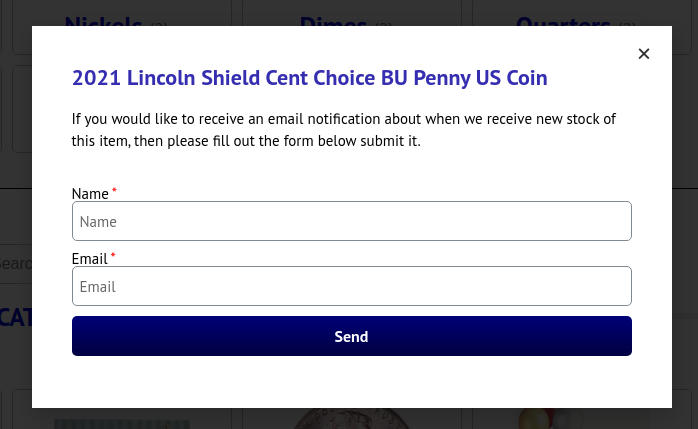
A wishlist is a similar feature to the Notify Me. 

The purpose of a wishlist is to collect up all the items that you plan to buy in the future but can’t or don’t want to right now. 

You can put both in-stock and out-of stock items in the wishlist. That’s one difference from the Notify-Me feature, the other one is that you will not get notifications when an item in your whislist goes in or out of stock. 

The wishlist is tied to your account and it’s saved. It will be available as long as your account is active.

Adding an item to the wishlist

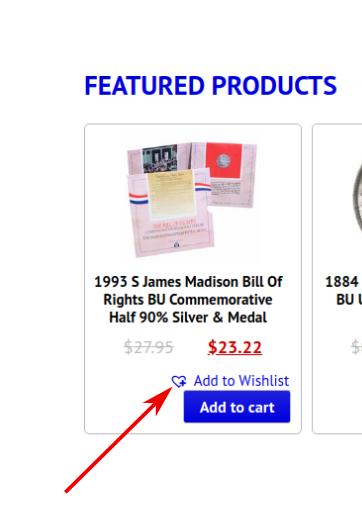
You can very simply do that by clicking on the Add to Wishlist link in a product tile, or in the detailed view. 

Viewing your Wishlist

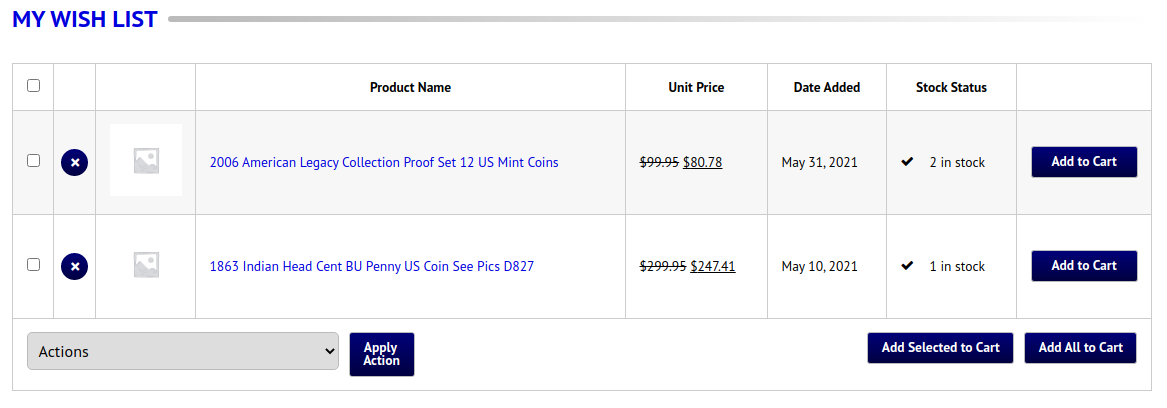
When you add an item to the wishlist you will have option to view the list of items that you already have.

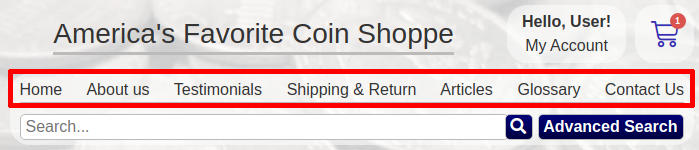
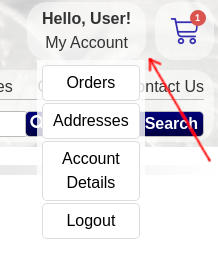
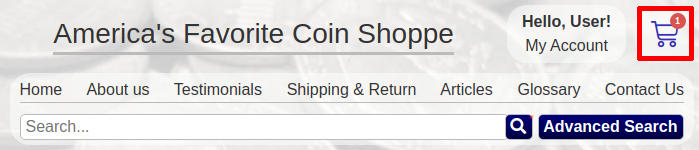
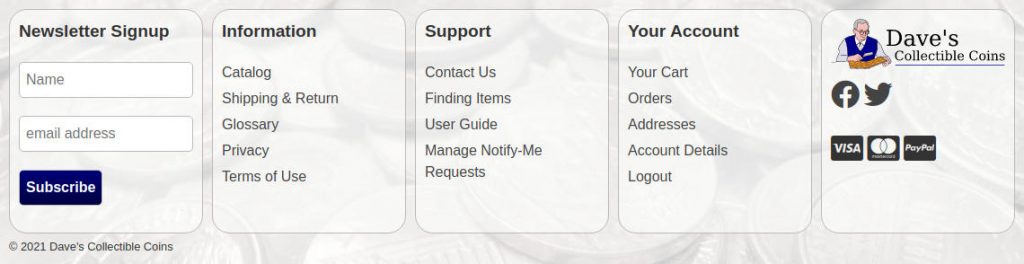
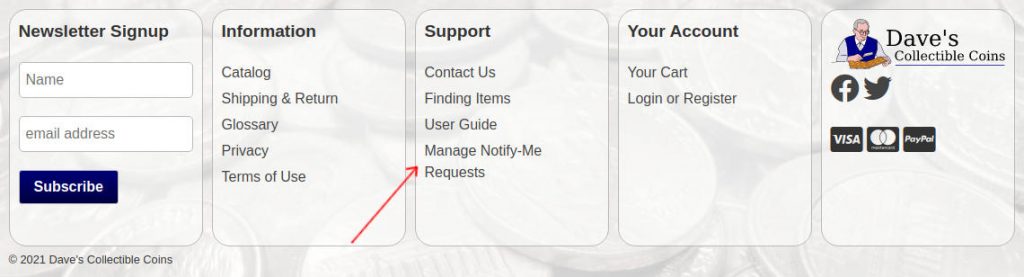
You can also get to this list by clicking the Wishlist link in the header (under My Account) or in the footer (in the Your Account section). 

In the Wishlist view page, you can do the following things:

  • Remove items from the wishlist
  • Add an item to the cart
  • Add all items to the cart

Note regarding quantities: When you click on Add to Cart, then a quantity of one of that item or items will be added to the cart. If you want to change the quantities then you will need to go to the Cart page where you can modify the quantities in your cart.

Sharing your wishlist

In some cases you might want to share with others (family or friends) your wishlist. For example, for Christmas, you can show someone what they could buy to you that you would be happy to have. 

To get the shared link click on the Share Wishlist button and select how you want to use the link (eg: on Facebook, in email, etc). 

The shared link will open up the same wish list page for other but it does not allow them to modify it (ie: they can’t delete anything) – that is only available when the page is viewed under your account. But they can put the items in the Cart.

Adding an item to the wishlist
An example of a wishlist page

The Product Detail Page

You will see this page when you clicked on a product tile. This page will show you all the information we have on a particular coin or other product.

On the left, you will see the pictures of the coin with a zoom-in tool. Very similar to how eBay works: clicking on the thumbnail version of a picture below the big picture, will switch to that image. If you use a mouse then you can see a very detailed zoom as you move it over the main, big image. If you are on a touchscreen device then you can zoom in to a particular area by tapping on it.

The right side contains all the information about the product you are viewing.

There is also an Add to Cart button but it has a quantity box, so you can add multiple quantities at once.

Below the product details we show a couple of similar items that might be of interest to you.

The Product Detail Page

Account pages

There are a couple of special pages that you can access if you have an account and you are logged in. You can get to these pages via the links in the header or footer, from any page. Here is what you can find here:

Dashboard: an overall summary of your account, showing also if you have any store credits

Orders: this page lists all your past orders for your reference.

Addresses: here you can set your billing and shipping addresses. If you have these set up then the checkout page will use them and it will make the checkout faster.

Account Details: On this page your can change your name, email, or set your password.

Logout: it simply logs you out.

Notes on The Accounts

We have developed and implemented a simplified system based on the experience we had on our previous websites.

We made the creation of an account as easy as possible. To get a new account created you will only need to provide your name and email address. This will create a new account that need to be further set up and your email address verified by clicking on the link sent to the email address you provided.

Also, by creating an account you will automatically get logged in and can access all the account related pages.

If you log out, or get logged out for some reason or other then you can very easily log back in by providing your email address and last name, and some other personal information from your account setup such as phone number, or ZIP code. If you are logging in on a computer that you have used before, the only required information is your email and last name.

We are attempting to eliminate passwords as it has been a constant problem with people forgetting them or making typos when typing them and thus get frustrated. However, if you feel that you require a higher level security for your account then you can easily set up a password requirement on your account in the Account Details page .

Store Credits

We also have a store credit system. Your account can get a store credit due to refund, or as part of a promotional action.

If you have a store credit then you can see that in the Dashboard page of your account

Also if you go to the checkout page, there will be a section called “Your Store Credit” where you can specify how much of your store credit you would like to use for the particular purchase.

You can see an example here showing using the store credit to fully cover a purchase. You can also cover part of it. You have full control when and how much of it you use.

The Shopping Cart Page

You can get to this page via the Shopping Cart icon, or via the link in the footer.

As usual, on this page you can remove items you might have accidentally added, or change the quantities on any item. If you change the quantity, make sure to click on the update cart button to record the change and re-calculate the amounts.

You can also chose the shipping methods.

When you are ready then click to the Proceed to Checkout button.

The Checkout Page

You can get here from the Shopping cart page, or via the shopping cart icon in the header.

We also made the checkout page as simple as possible, asking only the bare minimum information that we need for fulfilling your order.

First the address is needed to be filled out. If you are logged in your account and you have your addresses set up then those will be used here. But you can enter a different address here, if you wish.

If you have store credit then you can also apply it here.

Then you will see the order summary. If you notice some item that you would like to remove or modify the quantity of them click on the Back to Cart button on the top of the page.

And finally we have the credit card payment section. You will need to enter your credit card information here. 

Please note that due to security reasons we cannot store your credit card information. The credit card information you enter here does not go through our website at any point but it goes directly to our payment processor which has the required high level of security.

Feedback

We always strive to make our website to be more user friendly. If you noticed something missing, not working properly or just have a suggestion for improvement, then please let us know. On every page, you have the Contact Us menu right on the top which will send your message directly to us.

We are looking forward to hearing from you!

Contact Us

The easiest way to get in contact with us is by filling out the form  and submitting it.
We will contact you as soon as we can.

Mailing Address

David Enders

PO Box 508
Athens MI 49011

Customer Service

The Dave’s Collectible Coins customer service goal is simple: 

We are committed to providing our customers total satisfaction. Every time. Guaranteed.

For non-urgent matters please use the form in this popup. For urgent matters please call 269-742-4716.

Customer service is available Monday – Friday 8:00am – 4:30pm EST